Being a Mechanical Engineer, I've always been intimidated by electrical design work, but I've finally worked up the courage to take on the flowing charges and do some calculations!
As it turns out, determining our battery size is fairly simple. When we’re looking at batteries online, there is a lot of superfluous information that we don’t need to concern ourselves with. The 2 things we DO need to know about are the Voltage and the storage capacity (in Amp/hour or Ah).
Now, let’s assume our vehicle uses 22.35 Wh of electricity when driving at 15 mph. We’re using this as an estimated value only for our baseline calculation (data extrapolated from cyclone-usa.com test results for the same 500W motor).
As a base point, let's assume we want to travel 30 miles at 15 mph; therefore, we are going to consume 670.50 Wh of electricity during that trip.
Now to figure out how many Wh are in a battery multiply the voltage by the amp hour (ex: 12V x 75 ah = 900 Wh) The battery I'm looking at is HERE.
Seeing as that the motor we’re using is a 24V motor, we will need TWO 12V batteries to make a 24V system and our calculations are revised liked this: 24V x 37.5 ah = 900 Wh. (notice the Wh doesn't change when converting to a 24V system. This applies to 36V, 48V, etc. systems as well.)
Looking at these figures, it appears that we can get away with using just (2) 12V batteries and we will exceed our range/speed requirements; however, because we’re using sealed lead-acid batteries, we need to take into consideration that you can’t take lead-acid batteries below 50% capacity without damaging/degrading them and lowering the battery life substantially. Therefore, in order to meet the criteria set (minimum 1340 Wh total), we need (4) 12V batteries. At $158 a pop, that’s $632...
Now, I think 30 miles is probably a little excessive and since I'm planning on riding this bad boy at low speeds and on flat ground, I can probably get away with (2) 12V batteries; which if I back calculate, I'll probably get a little more than half the distance (15miles) or half the speed (7.5mph)...I think I'll be okay with that. Whew, that's enough electrical for me for one week. =P

Tuesday, April 19, 2011
Wednesday, April 6, 2011
ROLLIN'!
FINALLY! Except for a little bit of truing, the wheels are done! This has been the most time consuming part so far and I can't possibly see anything else taking sooo long. The concept from these wheels came from the Team Save Ferris Red Bull Soapbox car. They had a similar style car (thru axles) and I really liked the way theirs turned out.
I started with the hubs: the 2 existing hubs from the original tricycle and the 2 new 20mm Bitex thru-axle hubs. Then came the rims: 20"dia by 4" wide rims meant for those OCC Stingray chopper bikes. Associated tubes and tires included.
Finally was the spokes: I used a combination of 186mm and 176mm spokes to get the pattern I liked. I used a cross hub pattern with supports on the outside.
Here's a good before and after:


Showing the spoke pattern:


and completed:


Looks like I might be riding this thing around at CicLAvia this weekend...keep an eye out for me.
Monday, March 21, 2011
Electric Motor
Since the weight of this puppy is probably gonna be pushing 200+ lbs I figured an electric motor would be quite handy when trying to ascend ANY sort of incline. To keep things simple, I opted for an electric motor kit meant for a bicycle and adapted it for my rig. I went with a kit from cyclone-usa.com which included a 500W motor w with controller, gearbox and 14T Freewheel Sprocket; mounting brackets and bolts; a 44 tooth freewheeling chainwheel and crank arms (see previous post for installation); brakes with motor cutoffs; and a battery connection harness.

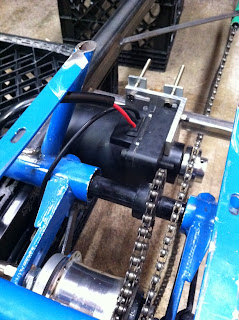 I mounted the motor as close to the rear drive as possible to minimize the slack between the two. With the makeshift brackets, we'll see how well she holds up.


Monday, March 7, 2011
Bottom Brack Freewheel
While I wait for wheels to be finished...I've started working on the electric motor setup. This means I need a freewheel on the bottom bracket if I want to run the electric motor without pedaling. Also, since this started life as a "beach cruiser" type bike, it's got a 1-piece crankset...which is pretty tough to work with if you want to do any sort of modification.
Here's what it looks like:

 Now that these are removed (may require some grinding if tack welded in place; mine were not) as well as any excess paint or crud; I can install the conversion kit. Remember to line up the screws before pounding this bad boy into place! Dun-did that before...
 Once the conversion kit is in place, you're all set up to run threaded cranks! Freewheeled bottom bracket FTW! This freewheel crankset came in the electric motor kit I purchased from cyclone-usa.com

We'll be rolling soon!
Here's what it looks like:

Now, in order to run a threaded bottom bracket, I needed to buy a cruiser to threaded conversion kit; and to install it, I needed to remove the old cranks, and bust out the old cups.


We'll be rolling soon!
Sunday, February 27, 2011
Steering and More
Now that the overall frame is done, it's time to start building onto the frame. First up are the front steering arms. These are the steering arms we made to accept the 20mm hubs.

 Originally, I had intended to do the steering tie rod in front of the axle; however, the head tube was in the way. Flipping the steering arms allowed me to locate the tie rod behind the front axle which worked out better because it cleared up the space in front of the axle for foot and leg clearance for pedaling.

 Here's some nice welding pictures.


We're on the fast track now! More updates soon! The wheels have been delays, but the electric motor is here. I need to build a bracket for it, route the chain, add idler pulleys, mount and route the controller, build a seat frame, find a seat, convert the bottom bracket to a threaded, and build a BODY! A lot of work to do.


We're on the fast track now! More updates soon! The wheels have been delays, but the electric motor is here. I need to build a bracket for it, route the chain, add idler pulleys, mount and route the controller, build a seat frame, find a seat, convert the bottom bracket to a threaded, and build a BODY! A lot of work to do.
The Frame is Done

Thursday, February 10, 2011
Update
The long anticipated 20" x 4" rims have arrived! Having a full rolling chassis is quickly approaching. Tomorrow I will be lacing up the 2 bitex 20mm hubs and the 2 rear wheels to new rims. Luckily everything is 36 hole so this shouldn't be too difficult. I think the only issue we might have is determining the correct spoke length for the 2 different hubs. I will have more photos to add after this weekend! For now, here's a picture of the head tube welded onto the front frame.


Subscribe to:
Comments (Atom)